
How to set up Email AutoArchiving for Outlook in 3 Easy Steps.
There are a couple ways to set up AutoArchiving within Outlook. This will move old emails from your main email profile into a different folder within Outlook. That way the archived emails are still accessible to you, however they are not stored on the server. If you check your email through webmail on a website browser you will not be able to see the archived emails. You will be able to get to them when working on your desktop.
Here are some quick Outlook steps to start AutoArchiving your email.
STEP 1: How to set AutoArchiving up in Outlook:
- [icon type=”angle-double-right” class=”fa-li accent”]Click File -> Options -> Advanced
- [icon type=”angle-double-right” class=”fa-li accent”]This window will appear:
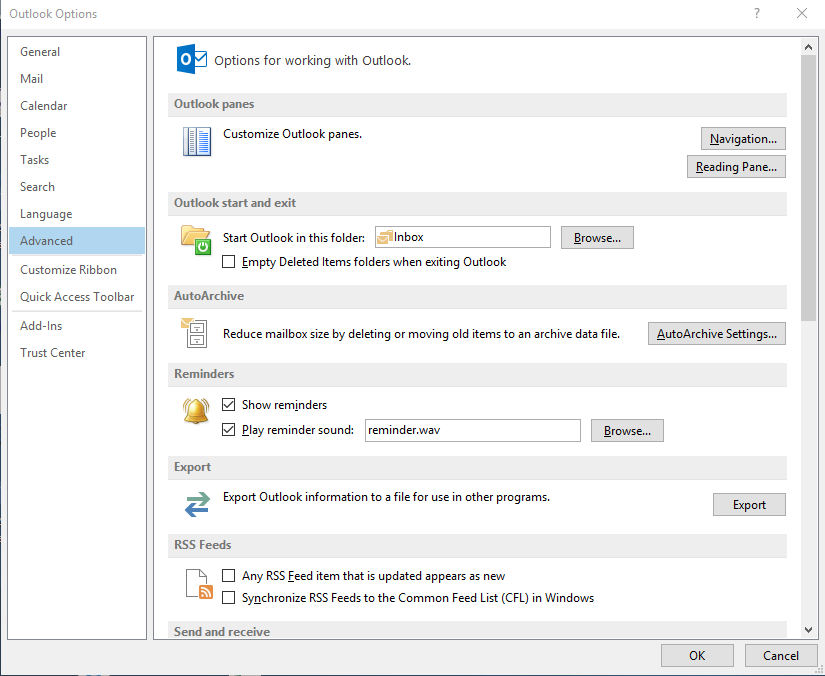
- [icon type=”angle-double-right” class=”fa-li accent”]Select “AutoArchive Settings”
- [icon type=”angle-double-right” class=”fa-li accent”]Another window will appear.
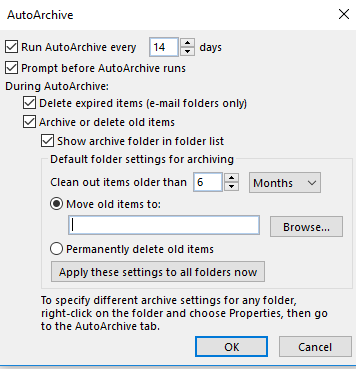
- [icon type=”angle-double-right” class=”fa-li accent”]You can click the check box and specify how often you want the Archiving to run.
Typically, your archived emails will be saved under a predetermined pathway similar to
“ad-svruserdatayourusernameMy DocumentsOutlook Filesarchive.pst”.
Most of these settings you will want to leave as default except for the Clean out items older than. You can change this to your preference date amount. - [icon type=”angle-double-right” class=”fa-li accent”]After choosing your options click “OK” twice to get back to Outlook.
STEP 2: Specify which folders you would like to archive
- [icon type=”angle-double-right” class=”fa-li accent”]Right click on a folder you want to archive and click “Properties”.
- [icon type=”angle-double-right” class=”fa-li accent”]Click the “AutoArchive” tab
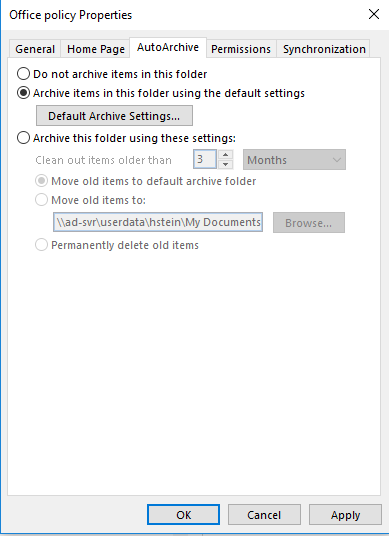
- [icon type=”angle-double-right” class=”fa-li accent”]You can choose to do one of the following “Not Archive”, “Archive items in this folder using the default settings”, or “Archive this folder with custom settings”.
- [icon type=”angle-double-right” class=”fa-li accent”]Choose the setting you’d like and click “OK”.
- [icon type=”angle-double-right” class=”fa-li accent”]Repeat these steps for all folders you’d like to archive.
STEP 3: Run the archive.
- [icon type=”angle-double-right” class=”fa-li accent”]Select “File”
- [icon type=”angle-double-right” class=”fa-li accent”]Click “Cleanup Tools”
- [icon type=”angle-double-right” class=”fa-li accent”]Select “Mailbox Cleanup…” from the drop down
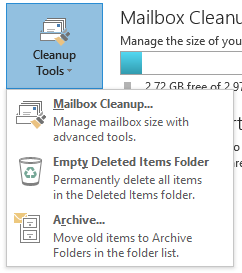
- [icon type=”angle-double-right” class=”fa-li accent”]Now click AutoArchive. This will run the AutoArchiving instantly.
Contact us if you have any questions!